

是不是你刷的 OpenWrt 固件都有这样一个应用 ZeroTier?这个 ZeroTier 别的作用暂时不知道,但是有个作用是可以提升爬墙速度。
官网: https://www.zerotier.com
官方Github:https://github.com/zerotier
开始使用 zerotier
进入 https://my.zerotier.com/ 注册一个账号。然后选择 Networks 添加一个网络

如图所示,你会得到一个 Your Networks ID
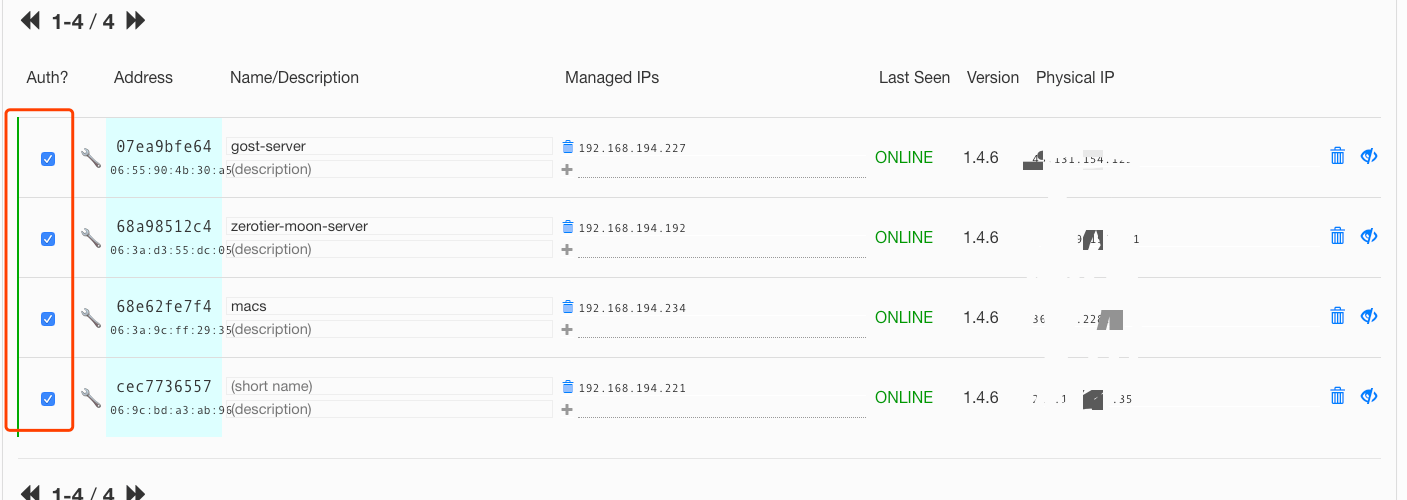
注意:每次我们添加 VPS 到 zerotier 到时候都需要点进我们的 network ID 拉到后方,然后 Auth? 的方框上勾选 如图
搭建 zerotier-moon 服务器
1.在国内一台 Linux 服务器上安装好 zerotier
curl -s https://install.zerotier.com/ | sudo bash
2.加入 network
zerotier-cli join #<>需要去除 network ID 参考上图马赛克位置
3.生成 moon 模板
cd /var/lib/zerotier-one
zerotier-idtool initmoon identity.public > moon.json
4.修改 moon.json
vi 编辑 moon.json,修改 “stableEndpoints” 为 VPS 的公网的 IP,以 IPv4 为 8.8.8.8 例:
"stableEndpoints": [ "8.8.8.8/9993" ]
其中 8.8.8.8 是你国内中转 VPS 的公网 IP 后面 / 9993 是 zerotier 默认端口
5.生成签名文件
zerotier-idtool genmoon moon.json
生成签名文件后你将会得到一个 000000xxxx.moon 的文件
6.将 moon 节点加入网络
在 VPS 的 Zerotier 安装目录下(/var/lib/zerotier-one)建立文件夹 moons.d,将生成的 .moon 文件拷贝进去。
重启 zerotier,重启电脑。至此,VPS 上(moon 服务器)配置完成。
cd /var/lib/zerotier-one
mkdir moons.d
cp 生成的 moon 文件全名 moons.d #这里的 moon 文件是刚才生成的签名文件
7.记录 moon 的 ID
我们后面爬墙的客户端跟服务端都需要加入 moon 的网络中,所以 ID 是必须要记住的
grep id /var/lib/zerotier-one/moon.json | head -n 1
"id": "xxxxxxxxxx" #此处是你需要记住的ID
8.重启 zerotier
复制过去后我们需要重启 zerotier 并重启 VPS
systemctl restart zerotier-one
reboot
其中我们的 moon 节点建立完成了。
客户端加入 moon
这里只说了 Linux 的加入
moon 的服务端节点建立后,我们退出服务端的机器,开始连接我们客户端 ssh
重复上面的 zerotier 的安装,安装完成后我们同样的也要先加入 network ID
zerotier-cli join #<>需要去除 network ID 参考上图马赛克位置
注意:这里的 ID 是第 2 步的 ID 不是 3.6 的 moon 的 ID
然后我们再加入 moon 网络
zerotier-cli orbit xxxxxxxxxx xxxxxxxxxx #这里的xxx是我们的3.6获得的moon ID 需要重复两次!
然后重启 systemctl restart zerotier-one
不出意外的话你的 VPS 就连接上了刚才我们建立的 moon 节点,此刻我们只需要 ping 一下你其他组进 moon 节点的机器就可以看到是否加入。
其他客户端下载:https://www.zerotier.com/download/
测试有没有加入 moon
zerotier-cli listpeers
修改 moon 服务节点自定义端口
默认的 moon 节点使用的是端口:9993
但是有的时候我们需要自定义端口
在 cd /var/lib/zerotier-one 也就是 zerotier 运行的目录下建立 local.conf 文件
vi local.conf #写下如下配置
{
      "settings":
   {
      "primaryPort":9994 #自定义端口
    }
}
完整的 local.conf 配置
{
    "physical": { /* Settings that apply to physical L2/L3 network paths. */
        "NETWORK/bits": { /* Network e.g. 10.0.0.0/24 or fd00::/32 */
            "blacklist": true|false, /* If true, blacklist this path for all ZeroTier traffic */
            "trustedPathId": 0|!0 /* If present and nonzero, define this as a trusted path (see below) */
        } /* ,... additional networks */
    },
    "virtual": { /* Settings applied to ZeroTier virtual network devices (VL1) */
        "##########": { /* 10-digit ZeroTier address */
            "try": [ "IP/port"/*,...*/ ], /* Hints on where to reach this peer if no upstreams/roots are online */
            "blacklist": [ "NETWORK/bits"/*,...*/ ] /* Blacklist a physical path for only this peer. */
        }
    },
    "settings": { /* Other global settings */
        "primaryPort": 0-65535, /* If set, override default port of 9993 and any command line port */
        "portMappingEnabled": true|false, /* If true (the default), try to use uPnP or NAT-PMP to map ports */
        "softwareUpdate": "apply"|"download"|"disable", /* Automatically apply updates, just download, or disable built-in software updates */
        "softwareUpdateChannel": "release"|"beta", /* Software update channel */
        "softwareUpdateDist": true|false, /* If true, distribute software updates (only really useful to ZeroTier, Inc. itself, default is false) */
        "interfacePrefixBlacklist": [ "XXX",... ], /* Array of interface name prefixes (e.g. eth for eth#) to blacklist for ZT traffic */
        "allowManagementFrom": "NETWORK/bits"|null, /* If non-NULL, allow JSON/HTTP management from this IP network. Default is 127.0.0.1 only. */
        "allowTcpFallbackRelay": true|false /* Allow or disallow establishment of TCP relay connections (true by default) */
    }
}